When Intel introduced their new Broadwell-E CPU lineup it compelled motherboard manufacturers to launch a new series of motherboards. Fair enough but interestingly this new CPU lineup works on the same old LGA 2011-3 socket type which the previous Haswell-E CPUs operated upon and hence old boards with a new BIOS and firmware updates could run these new CPUs quite easily!
Gigabyte just like other manufacturers jumped into the race and came up with an entirely different lineup of X99 PCH boards that not only had new names but had an entirely new and redesigned BIOS.
One such motherboard is the Gigabyte X99 Phoenix SLI which thanks to Gigabyte India is sitting right on our table for review! Much like the Gigabyte X99 Ultra Gaming that we reviewed earlier this one also has an unconventional name from the Gigabyte's regular.
Just like the new X99 PCH lineup this one also comes with a 32Gb/s M.2 and U.2 support along with USB 3.1 and even a USB Type-C support. Interestingly Gigabyte even added a Intel WiFi/Bluetooth adapter to this mix and gave it a slight edge and distinguishing factor.
Also since its from the refreshed X99 lineup from Gigabyte the trademark DIMM slot RGB LEDs are also present with rest of the bells and whistles.
Packing and Accessories
Gigabyte seems to have worked on this motherboard from ground up and its evident from the packaging itself. Its a glossy textured pack with the product name clearly mentioned on the lower half in a RGB tinted font accentuated by a massive G1 Gaming logo in the center and this time its bathing in colors like frenzy!
The pack is of high quality and feels heavy with a suitcase like design.
The back has a similar layout like the previous boards with exclusive new features taking center stage such as the Ambinet Surround LED and Dual Hybrid Fan Headers. All in all the packing is impressive and I kind of like this new shiny layer on the box.
You can see that a hint of the signature orange color is present on the pack aswell.
The accessories for the X99 Phoenix SLI are minimal and include a user manual, quick installation guide, driver disk for both the motherboard and the wireless network card, six SATA cables, I/O Shield, one 2-way and one 3-way SLI connector, one RGB LED 4-pin extension cable, Velcro cable ties, a G connector, a 1-to-3 power connector, the WiFi antenna, door hanger, cable labels, and G1 case badges.
Closer Look & Features
Take the board out of the box and surprise surprise! Its a white and orange color themed motherboard! This is an unprecedented move by Gigabyte since the orange color was earlier limited exclusively to their overclocking series motherboards. This from my side is a welcome move over the usual black and red, black and gold or even the orange and black color scheme since this is both different aswell as vibrant suitable for modders or to be used in cases like the Thermaltake P5 that are bare naked!
The CPU are is quite tight if not cluttered partially because its a X99 PCH motherboard and partially due to the chunky I/O shield that rests on the left side pushing the DIMM-CPU layout to the right. You can easily fit in any waterblock if opted for liquid cooling but beefy air coolers might block the first RAM slots on either sides since they are just around 2.5cm away from the CPU socket.
The CPU socket is a LGA 2011-3 which means it'll support all the Intel i7 5XXX series Haswell-E aswell as the new Intel i7 6XXX series Broadwell-E processors. The CPU and DIMM slot pins are upgraded with few extra pins for less strain per pin while overclocking and are gold plated for better connectivity and long lasting performance.
On the left side to the LED illuminated RAM slots you'll find the standard 24pin ATX power plug and an internal SuperSpeed USB 3.0 header. A thing worth mentioning over here is that the comparatively 'low price' has bitten into some aspects of the X99 Phoenix SLI. For instance, there are no overclocking tools such as power and reset buttons, LED POST code display or CMOS clear switch but that's alright as they are not the determining features of a motherboard when it comes to true performance which we'll come to later on.
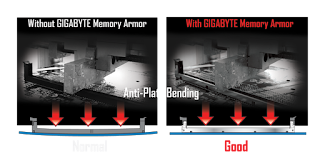
Earlier Gigabyte used to reinforce their PCIe slots but this time they've also reinforced their DIMM slots which they call a Memory Armour. One piece stainless steel shielding design prevents against PCB distortion and twist (Plate bending) in addition to preventing any possible ESD interference.
Coming over to the PCIe slots arrangement of the X99 Phoenix SLI, the first two PCIe x16 (PCIE_1 and PCIE_2) slots are both running at x16 speeds, the second pair (PCIE_3 and PCIE_4) are running at x8 speeds. The PCIE_4 slot does share bandwidth with the first PCIE x16 slot, so if the Ultra Gaming is running three cards the first slot will be running at x8 as well. In addition to the four PCIe x16/x8 slots, there is also one PCIe x1 expansion slot for prehistoric devices.
Single GPU: x16/x0/x0
Dual GPU: x16/x16/x0
Triple GPU: x8/x16/x8
Quad GPU: x8/x8/x8/x8
Note: The above is only applicable to a 40 PCIe lane processor since with a 28 PCIe lane CPU the fourth slot will be disabled.
A small yet notable feature lies in the spacing of the first and second PCIe slots that give more space between two graphics card when installed in SLI, this in turns maximizes the airflow keeping even heavy GPUs cool under load when used with stock air coolers!
Interestingly Gigabyte even stuffed in two M.2 slots in the mix with the first one located between the first and second PCIe slots & the second one between the second and third PCIe slots. The first one is populated with a WiFi/Bluetooth cards which the Phoenix SLI comes with right out of the box whereas the second one can support even the longest 110mm drives making it fit for almost any possible M.2 drive today.
Gigabyte opted for an Intel WiFi-Bluetooth adapter model no 8260NGW and supports 802.11ac dual band with 2×2 plus Bluetooth 4.2.
Coming over to the storage connectivity we see one SATA express connector and an astounding 10 SATA 3 6Gb/s connectors out of which 0-5 are RAID compatible ie the top five ports closer to the U.2 slot.
On the newer side Gigabyte has incorporated a U.2 slot aswell to this side of the X99 Phoenix SLI and it can now support the Intel 750 series SSD. This is a good move since it spares a M.2 slot which are highly demanded by professionals working with high end SSDs. Note that when using a processor like the 5820K or the 6800K the U.2 slot will be unavailable due to PCIe lanes limitations since the U.2 port is directly wired to the CPU.
A unique feature of the X99 Ultra Gaming is the on-board pin header for after market LED strips which makes it possible for the user to have full control over the strip via the provided ambient LED app giving the entire system a whole sum look & ambience. The pins are present right next to the PEG power connector used for providing extra power to graphics card while over-clocking.
The I/O panel is scantly populated with a PS/2 keyboard-mouse port, six USB 3.0/2.0 ports, two antenna ports, one USB Type-C port, one USB 3.1 Type A port, one optical S/PDIF out connector, two RJ-45 ports and 5x HD audio jack. I kind of miss the presence of a few more USB ports since we already have just one PS/2 port for keyboard/mouse.
The 8-phase power delivery to the CPU on the Gigabyte X99 Ultra Gaming is all digital. IR Digital PWM & IR PowIRstage® ICs provide precise current sensing accuracy, and better thermal load distribution. All eight black Cooper Bussmann 10K chokes are marked ‘1007R3 R15 41PH15 K’.
The MOSFETs used are eight International Rectifiers IR3556M PowIRstage solutions which are managed by the same company’s IR3580 PWM controller.
This kind of a power delivery arrangement should be more than enough to power and even overclock the 10-core Intel i7 6950X processor.
Gigabyte chose to stay with digital PWM control for all four DDR4 VRMs; the International Rectifier IR3570A is a 3+2 phase digital PWM perfect for this. Two of these PWMs are in use, one on each side of the board. There are four DDR4 VRMs because each set of DIMMs requires a DRAM voltage of 1.2v and a DRAM VPP voltage of 2.5v. The 1.2v rail is the most important, and on this board each set of DIMMs get two phases, each a 40A International Rectifier IR3553M.
Gigabyte's signature AMP-UP is powered by a Realtek ALC 1150 CODEC that achieves a 115db SNR while providing 10 DAC channels. It will simultaneously support 7.1 channels through the rear outputs and 2 channel independent stereo playback through the front panel.
Additionally for audio filtration high grade gold plated Nippon Chemicon electrolytic capacitors are used and a Texas Instruments OP1652 audio amplifier, this is the same arrangement that the Z170X SOC Force uses. The audio isolation strip is there to minimize hindrance from electric distortion generated by nearby components.
Sine the X99 Phoenix SLI isn't on the affordable side of the price tag Gigabyte justified the price tag by using a Intel's Alpine Ridge USB 3.1/Thunderbolt 3 controller for USB 3.1 functionality. Intel DSL6540 Thunderbolt 3 controller is used over here and obtains a 20Gb/s bandwidth from the four PCIe 2.0 lanes that it draws from the X99 PCH itself delivering a 10Gb/s bandwidth each to the USB Type-C port and the red colored USB 3.1 port located on the I/O Panel.
The Phoenix SLI comes with Dual LAN ports that can be teamed for load balancing or failovers through the bundled Intel's driver software. For this purpose two Intel NICs are provided onboard namely as the I211AT and the I 218V.
Two NEC D720210 chips control the USB 3.0 headers on the board and even the one's present on the I/O panel.
Lastly a set of NXP PCI-E 3.0 quick switches near the first PCIe x16 slot help in switching the PCIe bandwidth amongst the various PCIe based devices on the board.
BIOS and Bundled Software
BIOS
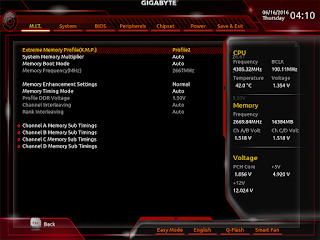
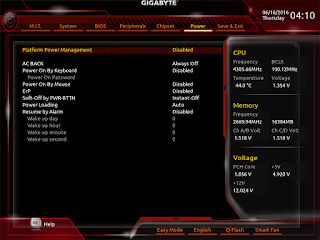
With new boards comes new features and maybe new BIOS aswell! Gigabyte has parted ways from its older BIOS styling that we are accustomed to bringing in a more balanced approach towards styling and functionality without any hassles or distractions.
The BIOS theme looks like a space ship HUD coated in blood red color scheme. The labels and tabs in the Classic mode are the same as the previous generation so users won't face any problem in finding their favorite settings.
Pressing the left Alt key brings up a small menus from the bottom giving you quick options like to switch to the Easy Mode, Change the language, Q-Flash and Smart Fan. Whereas the right Alt key brings a slider menu from the right side of the screen giving you vital information about the CPU/Memory frequency, Core voltage and temperature.
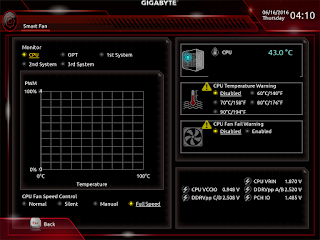
Smart Fan is well laid out and gives full control over fan behavior and AIO pumps. You can even set a custom RPM to Temperature graph!
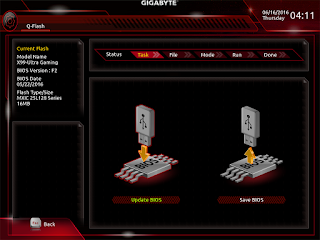
Q-Flash is for BIOS flashing and backup, I personally love the graphical approach that Gigabyte took even for such a small yet important function.
Last is the Easy Mode layout which gives a comprehensive layout of the common settings such as fan speed, energy options, XMP profile etc.
Bundled Software
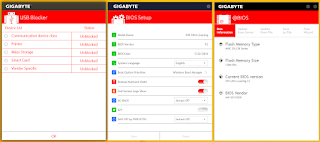
Gigabyte App Center is what they've been rolling out since a long time with their boards and nothing much has changed in that with time but with the Ultra Gaming they did bring a welcome change.
The main screen is now a proper window and not a pop up scroll bar from the bottom right of your screen. Three different tabs make it a one stop place since you get Gigabyte Apps in one and the entire Window's Control Center in another tab. A Third Party Software tab is also there though it only recognizes a few and in my case only the Intel XTU suite was recognized
Rest of the Apps look the same as previous with a few tits and bits of changes. But as long as they are functional/helpful I'm Okay with it and fortunately they all work just fine in my case. A thing worth noticing is that the Easy Tune App doesn't allow an overclock over 4.2Ghz on the i7 6900K which is a good approach since the new Broadwell-E processors generate a lot of heat at higher clock speeds & a novice overclocking them by just a click can damage the chip in absence of proper cooling.
Test Setup and Benchmarks
Getting the Gigabyte X99 Ultra Gaming up and running was a walk in the park! The CPU and memory installed flawlessly along with the graphics card and upon powering up we had no issues going into the BIOS or booting up. The LEDs can be controlled via the BIOS or the App center and work flawlessly either ways. By default the Phoenix SLI will stay constantly lit up in Orange color.
The LED defuser used in the board gives a pleasant glow which doesn't overpower or hurts the eyes if looked upon at any given instance.
Note: Initially I couldn't get the system to boot up with the XMP profile enabled on the memory kit. This issue can simply be solved by the latest BIOS update available from the official website. Just download the F4 version of the BIOS and put it onto a thumb drive that you can easily use to flash the BIOS from the BIOS Q-Flash section!
Our test bench for this session consisted of --
CPU: Intel Core i7 6950X 3Ghz Deca-Core Broadwell-E
Motherboard: Gigabyte X99 Phoenix SLI
RAM: Kingston HyperX Predator 16GB DDR4 (4x4) 3000Mhz Memory Kit
Cooler: Corsair H100i GTX 240mm Liquid Cooler (Push-Pull Configuration)
Graphics Card: Inno3D GTX 980 4GB DDR5 iChill Black Edition Accelero Hybrid S
Storage: Corsair Neutron GTX 480GB SSD
Power Supply: Corsair AX860i 860W 80+ Platinum
OS: Windows 8.1 Pro 64-bit
GPU Driver: NVIDIA ForceWare 355.60
BIOS: Version F4
Frankly speaking overclocking the i7 6950X requires more cooling than skills, that's one of the prime reasons why we used a push pull configuration on our H100i GTX with four Corsair SP120 Performance Edition Fans!
I easily achieved a 4.3Ghz on the i7 6950X at 1.37v and the Kingston Predator at 3000Mhz via its XMP 2.0 profile. For pushing the limits I took the 6950X at 4.4Ghz at merely 1.4v and the Predator at 3000Mhz CL13. At this point we couldn't keep the system stable due to our cooler's limitations but the Gigabyte X99 Phoenix SLI indeed proves its mettle to be a solid board for overclocking even the highest possible processors!
For he benchmarks we'll be using the i7 6950X at 4.3Ghz and the memory at 3000Mhz CL15
AIDA64 Cache & Memory Benchmark
AIDA64 Extreme Edition is a great tool to bench your CPU and RAM in terms of their read-write-copy abilities. Our i7 6950X showed an impressive score along with the Kingston HyperX Predator kit.
AIDA64 GPGPU
The reason for including this benchmark was to simply observe the AES and Hash Test which is a determent of how easily your CPU can crunch complex calculations and higher score is always regarded better. The i7 6950X at 4.3Ghz showed an amazing 48814MB/s and 11657MB/s for the AES-256 and SHA-1 Hash tests respectively!
7-zip
7zip is a compression and decompression program that utilizes the processing power of the CPU alone. It is a synthetic benchmark that gives results very close to real life scores.
Intel XTU
The Intel XTU utility not only helps one to overclock and test the system stability all in one place but also can be used to benchmark the processor in terms of comparative score. The i7 6950X at 4.3Ghz on the Gigabyte X99 Phoenix SLI showed a fabulous test run with an impressive score in the end at 2695 which is already higher than the i7 6900K at 4.3Ghz which we've tested earlier!
3D Mark 11 and 3D Mark Fire Strike
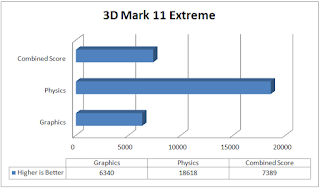
3D Mark 11 & 3D Mark Fire Strike are test suits that plays a cinematic scene to determine the FPS, GPU temperature and CPU temperature scaling everything via a cumulative score. They are a great tool to benchmark your GPU-CPU combination since the solid rendering is done by the CPU whereas the volumetric fog & field depth is done by the GPU.
The scores are as expected for the inno3D GeForece GTX 980 iChill Accelero S hence no bottleneck on the motherboard/CPU part is observed.
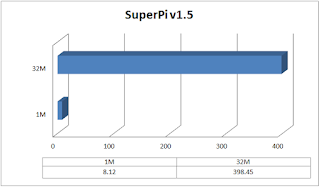
SuperPi Mod 1.5
A program meant to calculate the value of Pi stressing the CPU and Memory. A lower score is better and we can see the great score that the Ultra Gaming has obtained.
Cinebench R15 and Cinebench R11.5
Cinebench uses Maxon's Cinema 4D engine to render a photo-realistic scene of some shiny balls and weird things (we miss the motorbike). The scene is highly complex, with reflections, ambient occlusion and procedural shaders so it gives a CPU a tough workout.
As Cinema 4D is a real-world application - used on films such as Spider-Man and Star Wars - Cinebench can be viewed as a real-world benchmark.
wPrime v2.10
wPrime is a leading multithreaded benchmark for x86 processors that tests your processor performance by calculating square roots with a recursive call of Newton’s method for estimating functions.
CrystalDiskMark 5.0.2
CrystalDiskMark is a disk benchmark software that analyses different types of hard drive. Giving sequential benchmark write and read statistics in MB/s. A simple program that is very useful. As seen the Corsair Neutron GTX performs very well on the X99 Ultra Gaming.
My Verdict
Gigabyte has been a very consistent performer of their field making progress with every new release but with the X99 Phoenix SLI they've taken strides in the right direction! Orange and White combination is probably the best color scheme I've ever come across so far especially because the LEDs on this board are so subtle the whole package has its very own appeal to the masses.Performance wise the motherboard has ticked all the right boxes. Keeping a beast such as the i7 6950X stable at 4.4Ghz at just 1.4v isn't every board's forte. Triple Intel NICs is just too good to be true especially when one is for a dedicated WiFi-Bletooth M.2 Module. The best feature on the Phoenix SLI is its ability to support a M.2, U.2 and a USB 3.1 port all populated and working simultaneously which isn't a common feature in motherboards setting this board head and shoulders above the rest.
I did feel that Gigabyte should've added a post debug LED onboard for easy troubleshooting and its a feature that one can always use and refer to no matter if the motherboard is on an open bench or a fully loaded closed chassis.
In the end the Gigabyte X99 Phoenix SLI might be one of the best motherboards from Gigabyte ever *period* The Phoenix not only rose from the ashes but has burnt most of the competitor boards to ashes aswell by its sheer looks and performance!
Highly recommended for a new X99 build or even to anyone upgrading from an old X99 motherboard.
I give it a 9/10













.JPG)
0 comments:
Post a Comment